How to:
- Reset the 7941G and 7961 phones from SCCP (Skinny) to SIP.
- Reset the 7965G phones from SCCP (Skinny) to SIP.
Note: These instructions assume you are using FreePBX or Asterisk Now.
Install TFTP Server and Configure/Add Files for Installing/Upgrading Firmware:
1. Install the CentOS 6.7./7.x TFTP server.
(See FreePBX TFTBoot Installation in this support reference site for our installation notes.)
2. Update the DHCP server, and assign the phone a DHCP-based static IP. Click advanced, and set the TFTP server to the IP of your FreePBX. (e.g. 192.168.nn.100)
3. Verify/Transfer the files needed for the 7941 phones:
We already have folders and files left over from our Trixbox and 7911/7941 older phones. We transferred them already to the /tftpboot folder.
dialplan.xml
merlin2.pcm
OS79XX.TXT
RINGLIST.DAT
XMLDefault.cnf.xml
Note:
We are phasing out our old 7911s, and did not transfer their old files.
For the 7941, phones, the newest firware we could successfully image to them, the sip.8-4-2S. The SIP 8-4-2S release has the following files below.
Once you imaged the phone to this release, you can then walk it up (over several releases) to the latest we have, sip.9-4-2ES. We transferred these files to the /tftpboot folder.
apps41.8-4-1-23.sbn
cnu41.8-4-1-23.sbn
cvm41sip.8-4-1-23.sbn
dsp41.8-4-1-23.sbn
jar41sip.8-4-1-23.sbn
SIP41.8-4-2S.loads
term41.default.loads
term61.default.loads
Notes:
- As we don't have any 7961 phones, we don't technically need to copy the term61.default.loads to the TFTP server, .
- The 7941 and the 7965 have a few differences between their XML formats. Also the Freepbx box corrupts the last part of the 7941 and the 7961 XML so they cannot be loaded/read, so we keep a backup "pristine" template.
- If the phone is factory reset, you don't need the SEP<MACHEX>.cnf.xml file for the phone. It will load the firmware from the term41.default.loads file.
- IF the phone is already images, we temporarily populate the <loadInformation></loadInformation> tag with the SIP fireware we want to load. We don't do it in XMLDefault.cnf.xml "just-in-case".
4. Verify/Transfer the files needed for the 7965 phones:
apps45.9-3-1ES26.sbn
cnu45.9-3-1ES26.sbn
cvm45sip.9-3-1ES26.sbn
dsp45.9-3-1ES26.sbn
jar45sip.9-3-1ES26.sbn
SIP45.9-3-1SR4-1S.loads
term45.default.loads
term65.default.loads
Notes:
- As we don't have any 7945 phones, we don't need to copy this one either.
- Again the 7965 needs a bit different format for the XML. They are covered in the document titled: Cisco 7965/7965G SIP Asterisk Registering Error in this support reference site.
- If the phone is factory reset, you don't need the SEP<MACHEX>.cnf.xml file for the phone. It will load the firmware from the term65.default.loads file.
- IF the phone is already images, we temporarily populate the <loadInformation></loadInformation> tag with the SIP fireware we want to load. We don't do it in XMLDefault.cnf.xml "just-in-case".
_________________________________
Factory Reset Auth Failed Issue:
If you have a 7941 phone that will not upgrade/configure after the factory reset, and the power didn't go out part way through the install, it is likely not bricked.
1. Unplug the power to the phone (ethernet cable if POE, or w/an injector, or the power plug otherwise).
2. Plug the phone back in and watch the screen for the Upgrade screen.
a. The phone will show term41.default.loads with a checked downloaded checkbox. It will pause here for a couple seconds.
b. Then the phone will flash twice REALLY quickly, and barely print "AUTH FAIL". We had to shoot the screen with our phone to see the message, it was too quick to read.
This error messages does not mean you have an authentication issue, it means the firmware choice in the term.41.default.loads file being attempted is too new for the phone. 7941 needs to be walked up from the sip.8-4 release.
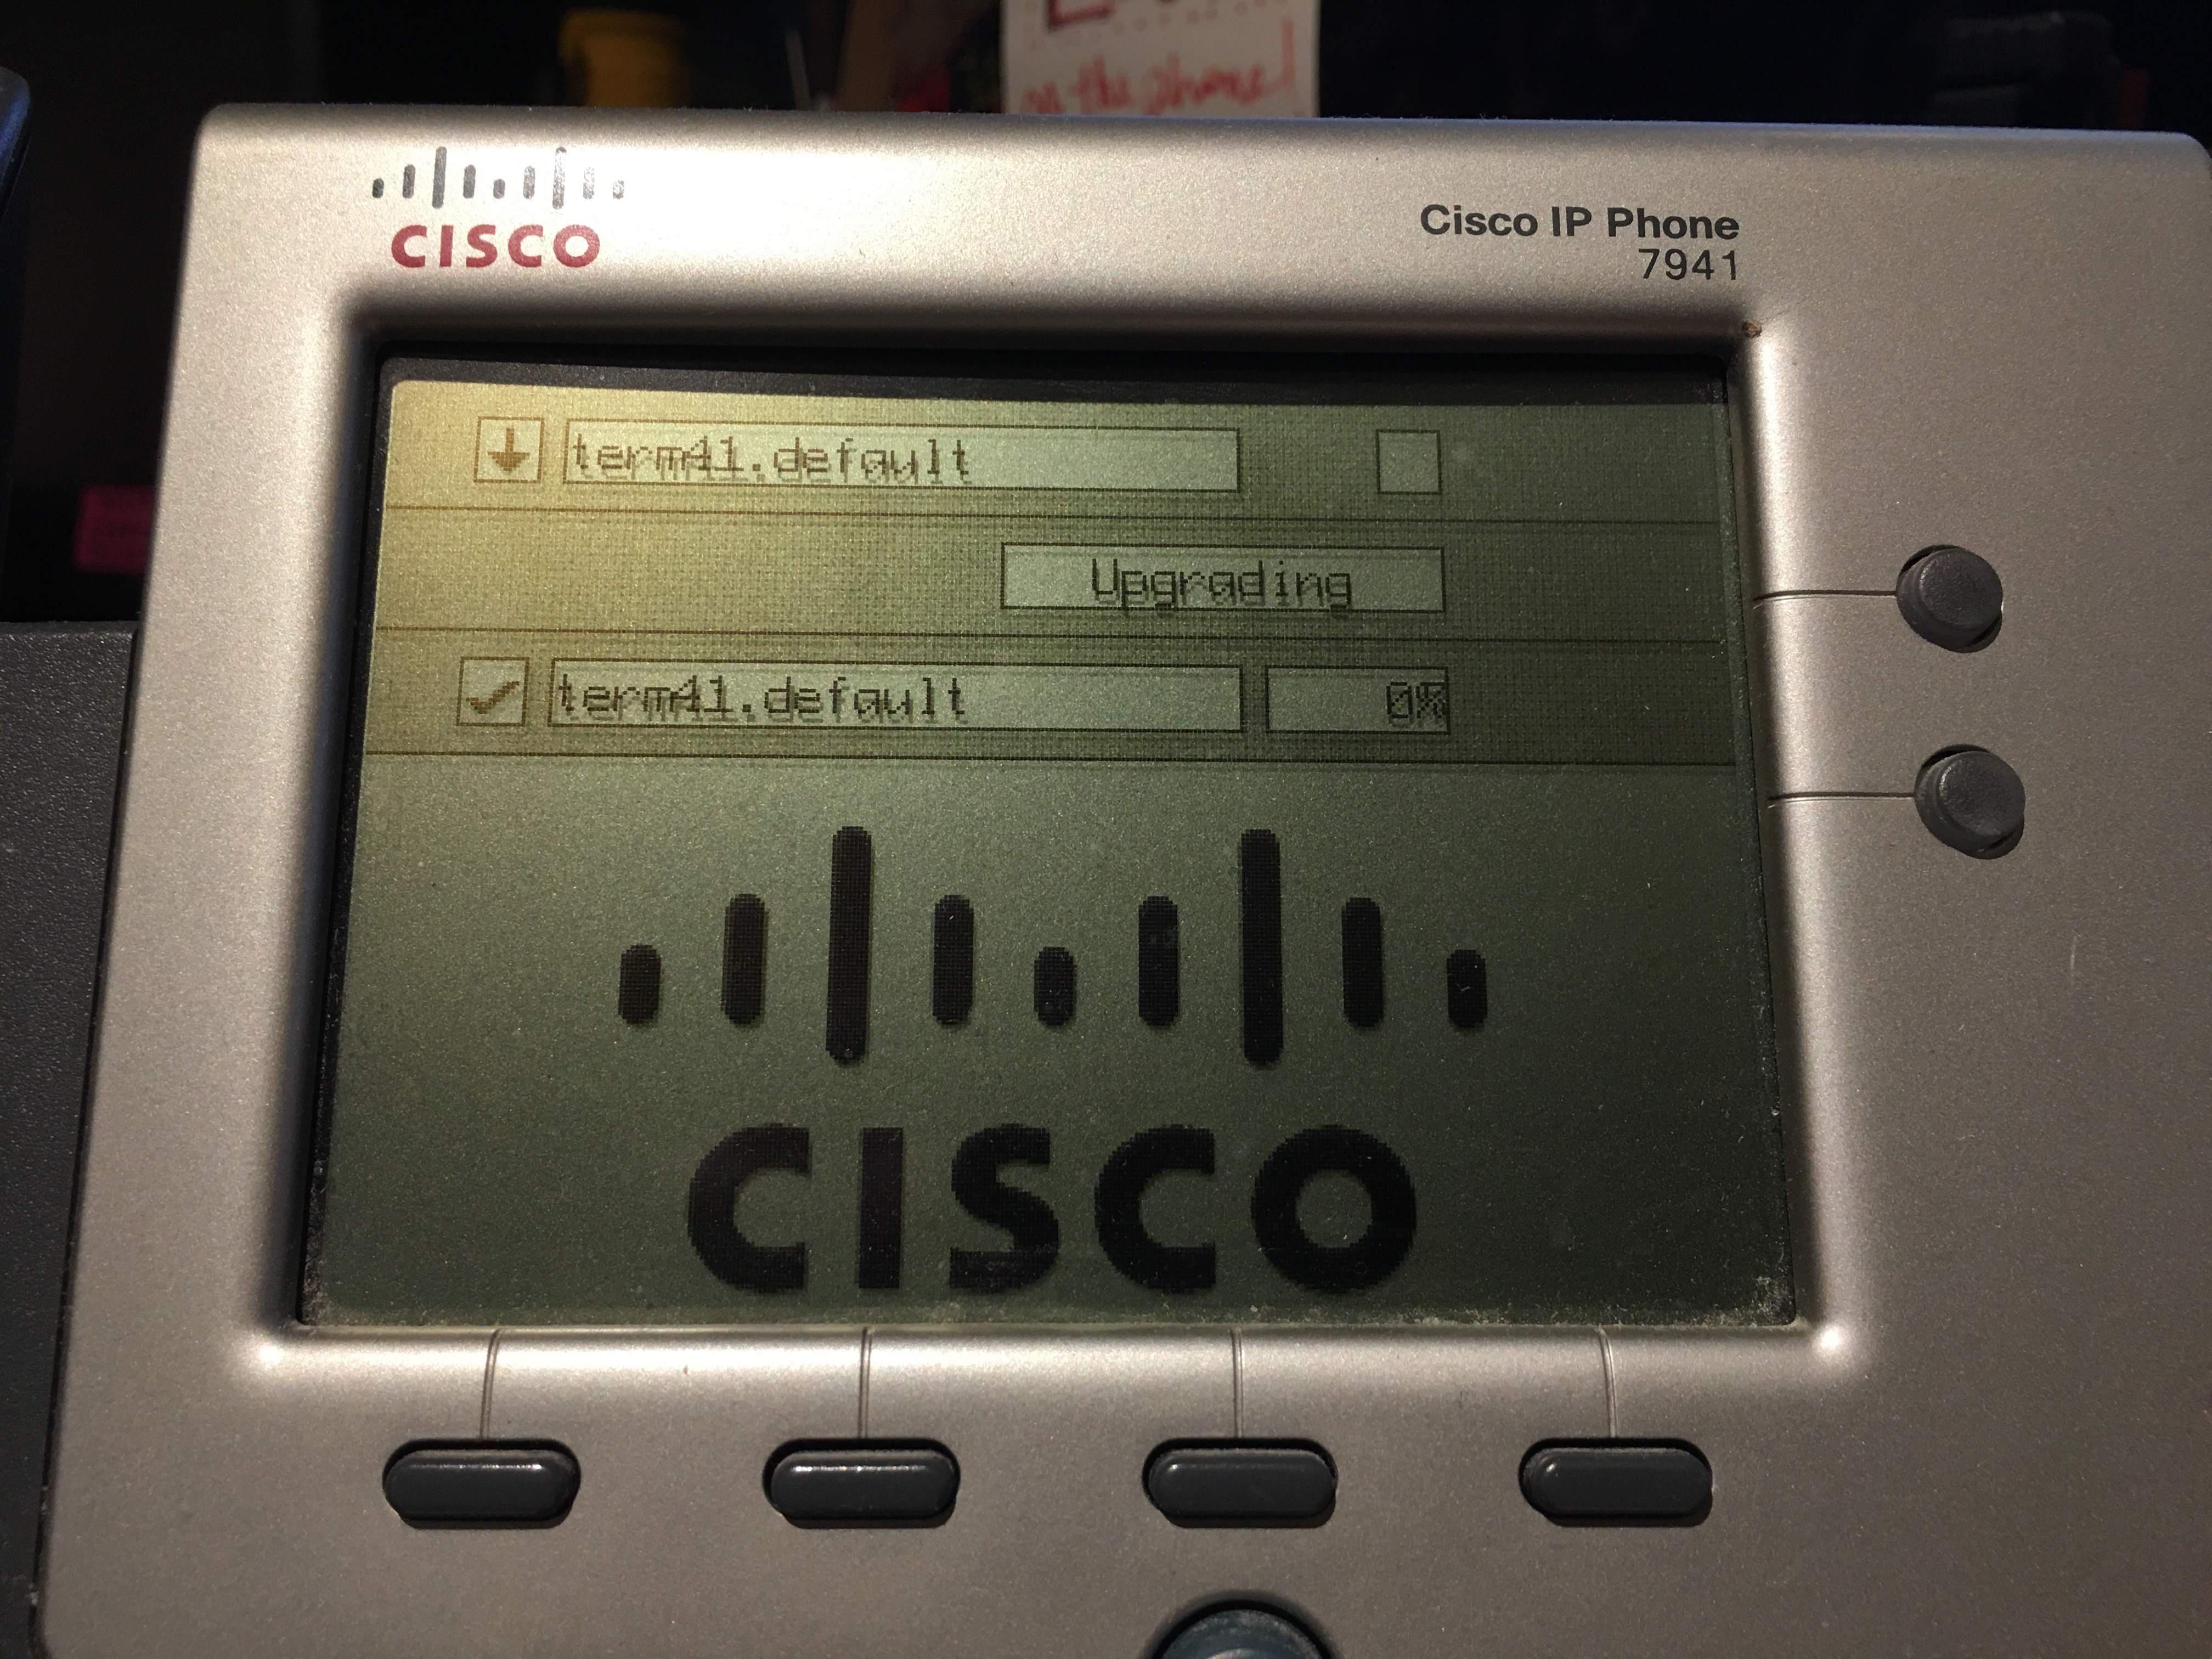
Step A Image:
The image below shows the phone successfully downloading the term41.default (loads) file. However, it sticks at 0% for a couple seconds or so.
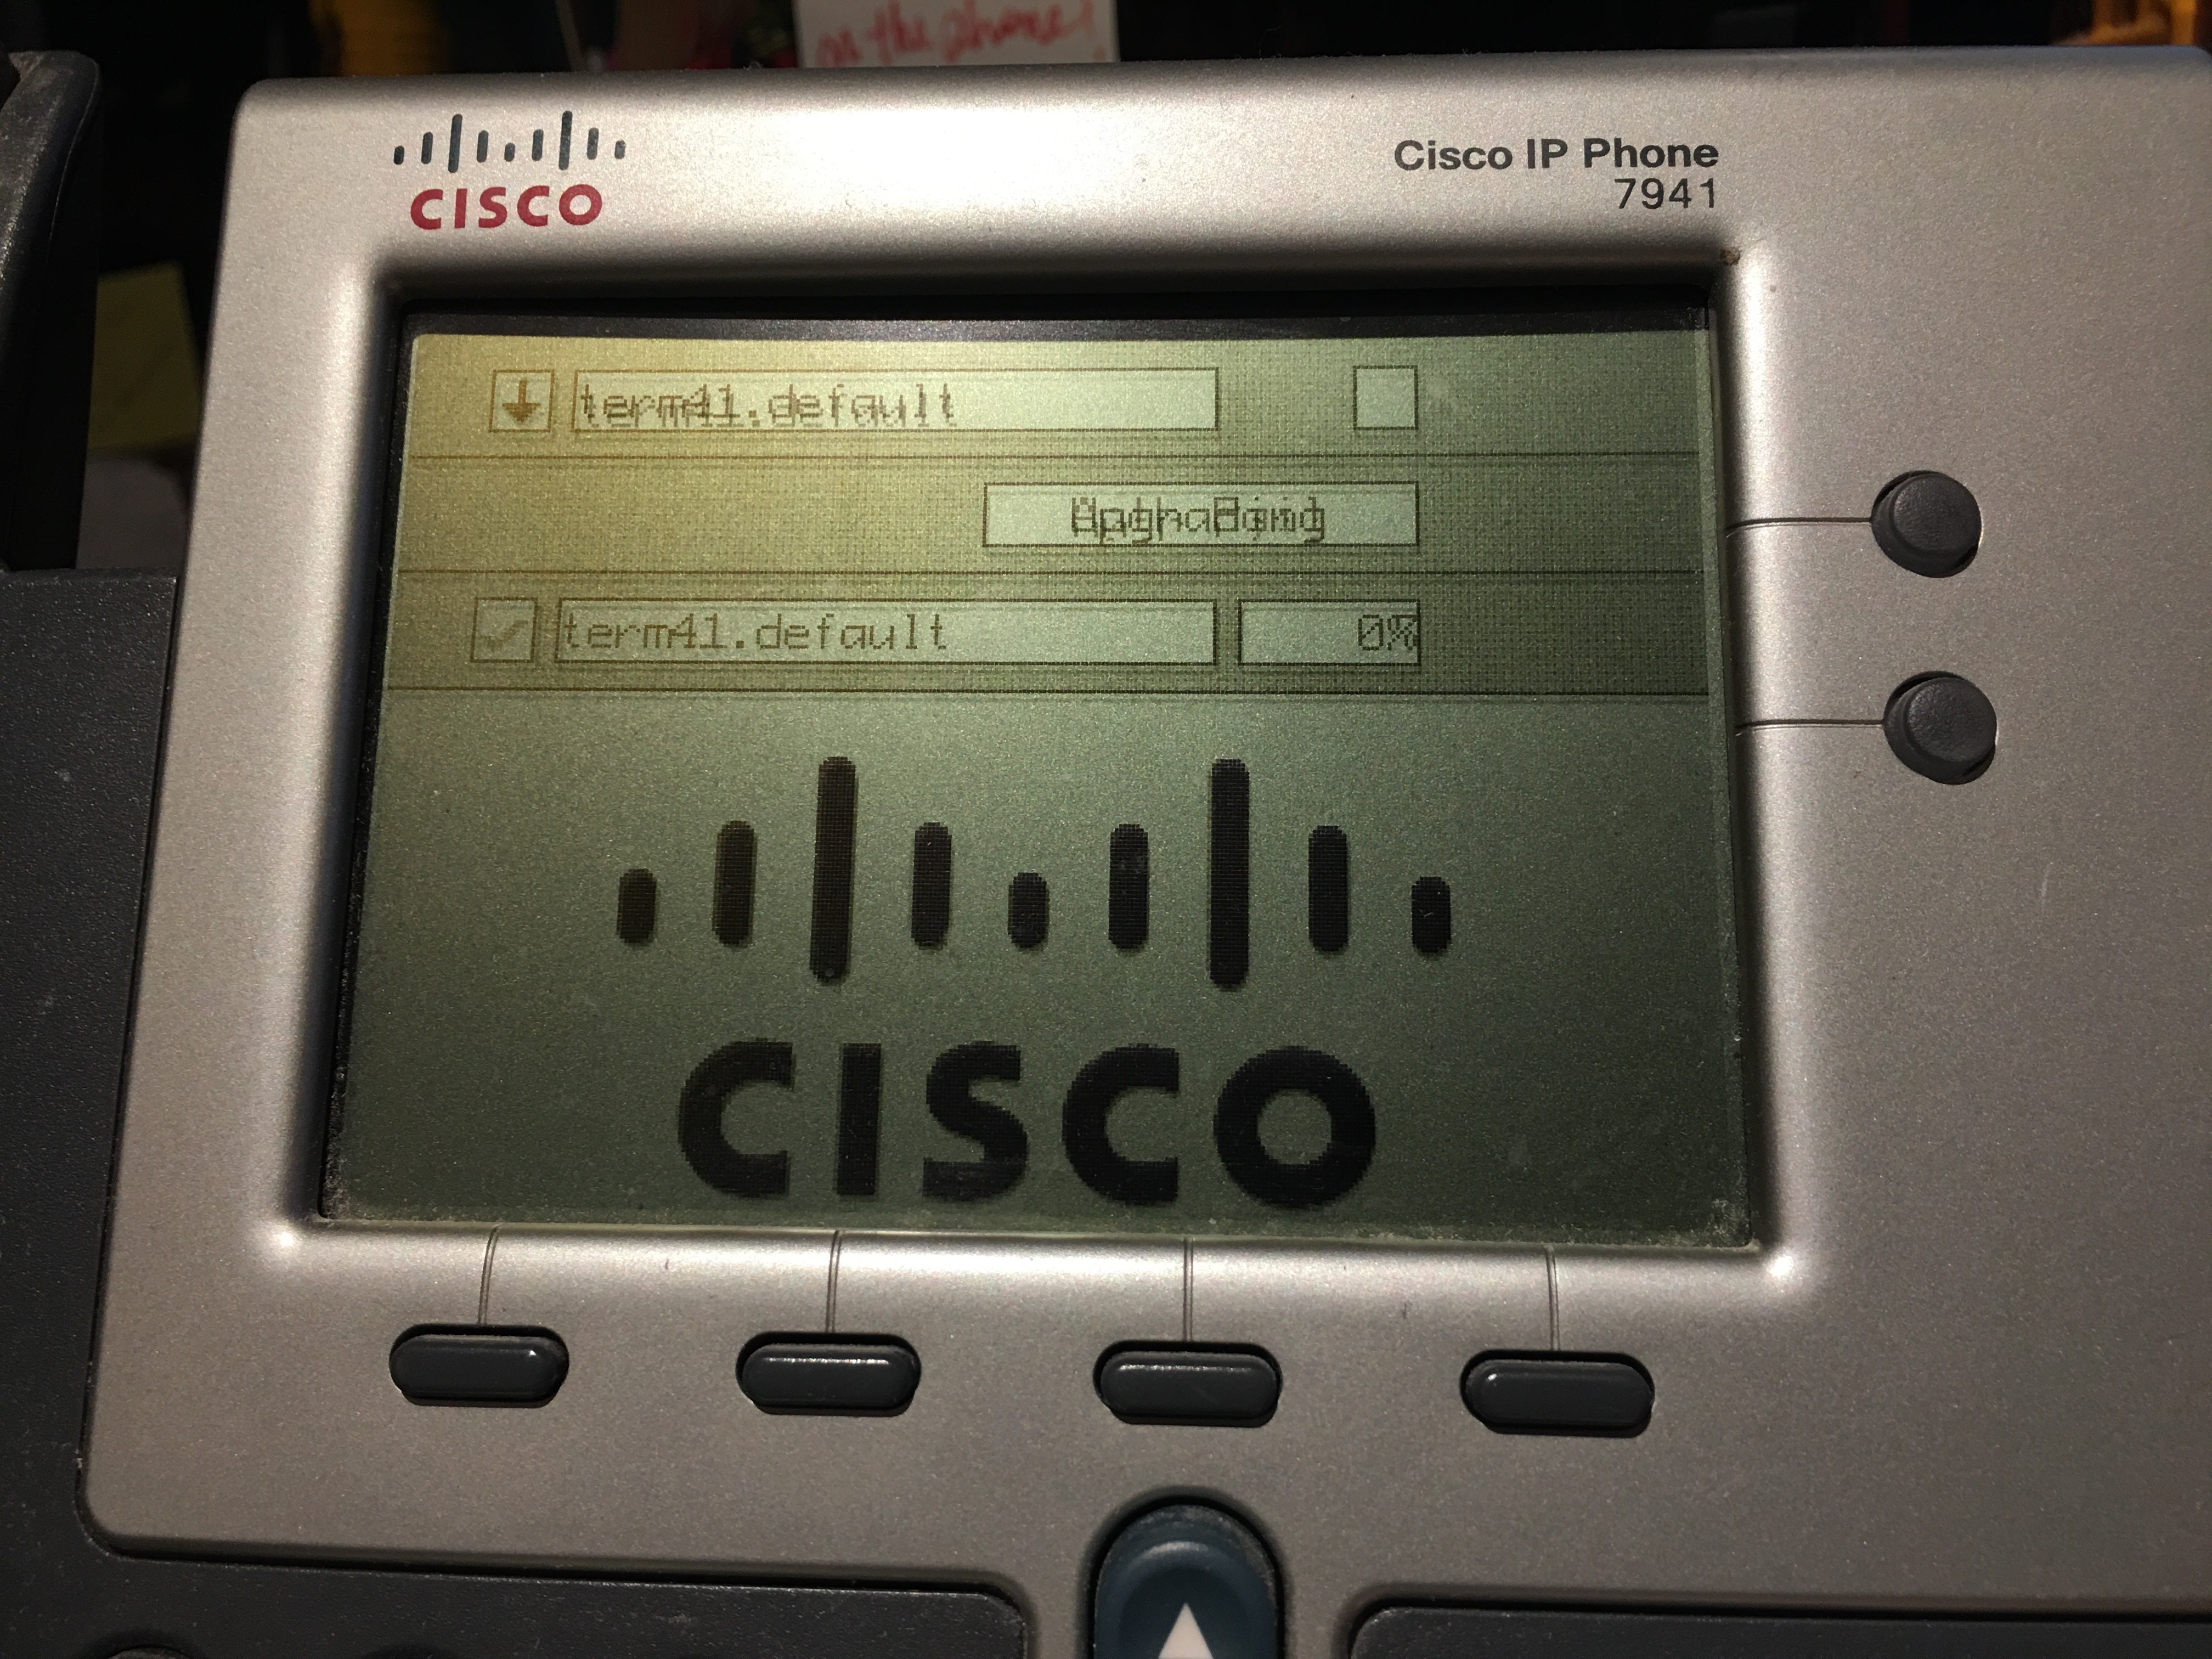
Step B Image:
In the screen below, we can just make out the Upgrading message being replaced with Auth FAIL
But as soon as the message is written, the phone screen resets, and it waits 5-10 minutes to try the upgrade again.
_________________________________
TrixBox Instructions (2008-2012)
1. Download a TFTP and DHCP server to a workstation to be a temporary network.
2. Load the files needed for a SIP transfer:
These files are "generic" in that they are not part of the SIP version download from the Cisco site:
797x_template.cnf.xml
dialplan.xml
merlin2.pcm
OS79XX.TXT
RINGLIST.DAT
SIPDefault.cnf
snom.cnf
syncinfo.xml
term41.default.loads
term61.default.loads
XMLDefault.cnf.xml
These files are specific to the phone's configuration:
(Trixbox automatically generates these when I added them to the Extension Manager. The following are the P003-08-6 SIP version unziped with the LOADS one copied for both extensions - got to love case sensitivity.)
P003-08-6-00.bin
P003-08-6-00.loads
P003-08-6-00.sbn
P003-08-6-00.LOADS
P003-08-6-00.sb2
Then you need a file for each phone that matches the MAC address of the phone. This file also specifies the SIP version to load. In fact , my XMLDefault.cnf.xml file does, too.
e.g. SEP001ABC123DEF456.cnf.xml
There are some xml lines to update for each phone:
...
(under devicePool ntp section)
<name>myserver.myfqdn.local</name>
...
(under callManagerGroup callManager section)
<processNodeName>myserver.myfqdn.local</processNodeName>
...
<loadInformation>POS3-08-6-00</loadInformation>
...
<authenticationURL>http://myserver.myfqdn.local/cisco/services/authentication.php</authenticationURL>
<directoryURL>http://myserver.myfqdn.local/xmlservices/PhoneDirectory.php</directoryURL>
<idleURL>http://myserver.myfqdn.local/xmlservices/index.php</idleURL>
...
<servicesURL>http://myserver.myfqdn.local/xmlservices/index.php</servicesURL>
...
<natEnabled>false</natEnabled>
...
<phoneLabel>MyName</phoneLabel>
...
<featureLabel>203</featureLabel>
<name>203</name>
<displayName>203</displayName>
<contact>203</contact>
<proxy>myserver.myfqdn.local</proxy>
...
<authName>203</authName>
<authPassword>MyPassword</authPassword>
....
3. Reset the phone:
- Click Settings button.
- Enter *##*, the phone will display Resetting in the lower left corner and then reboot.
previous page
|