| Installing a GFCI Outlet
This job is for the homeowner who has a bit more experience in home repair, but it is still easily done if you follow a few simple safety tips. In addition to te tools and materials already listed, you will also need a neon voltage tester, and electrical tape. If you feel your not ready to work with live electricity, have the job done by a professional electrician. It's also a good idea to pick up an electrical improvement book from the library, since pictures are always helpful.
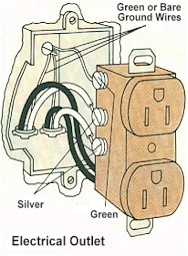 Begin by turning the power to the outlet off. A radio plugged into the outlet will help you to find the right breaker or fuse in you fusebox. . . when the radio quits playing, you have found the right circuit. Once you have the power off, remove the outlet cover and the two outlet screws located above and below the outlet. Carefully pull the outlet out of the box and use the neon voltage tester to be sure the power is off. There should be three wires running to the outlet, a green (or bare) ground wire, a white neutral wire and a black hot wire. Touch one probe to the hot wire and one to the ground wire. If the tester does not light, the power is off. You should always double check your circuits before you begin working, since the radio station might have gone off the air or someone may have turned the radio off, giving you the false impression you turned off the right circuit. Begin by turning the power to the outlet off. A radio plugged into the outlet will help you to find the right breaker or fuse in you fusebox. . . when the radio quits playing, you have found the right circuit. Once you have the power off, remove the outlet cover and the two outlet screws located above and below the outlet. Carefully pull the outlet out of the box and use the neon voltage tester to be sure the power is off. There should be three wires running to the outlet, a green (or bare) ground wire, a white neutral wire and a black hot wire. Touch one probe to the hot wire and one to the ground wire. If the tester does not light, the power is off. You should always double check your circuits before you begin working, since the radio station might have gone off the air or someone may have turned the radio off, giving you the false impression you turned off the right circuit.
(WHITE GOES TO SILVER SCREWS/SIDE. BLACK GOES TO BRASS/GOLD SCREWS/SIDE)
Once you determine the power is off, check the color of your wires. You should have a white, black and a green (or bare) wire. The black is the hot wire, white is neutral and green, or bare, is the ground. GFCI outlets come prewired with two sets of wires marked "LOAD" and "LINE". There will also be a green ground wire or a ground screw. Locate the pair of wires marked "LINE" and connect the two black wires together and the two white wires together. Then connect the ground wire. The pair of wires marked "LOAD" should each get a wire nut on the end and all wire nuts should be wrapped with electrical tape to protect the connections.
You may find that there are two pairs of wires connected to your original outlet. The second pair of wires feed other outlets along the circuit. You will need to find out which pair of wires feed the outlet you are working on. With the wires removed from the old outlet and the ends of the wires as far apart as you can get them, have someone turn the power to the circuit back on. CAREFULLY touch one probe of the tester to the ground wire and the other to each of the hot wires. The wire that caused the tester to light is the live wire. Remember which wire is live and have your helper turn the power back off, checking with the tester to be sure. The pair of wires which are live will be connected to the "LINE" pair of wires on the GFCI outlet and the other pair of wires will be connected to the "LOAD" pair on the GFCI outlet. Don't forget black to black, white to white. And, don't forget to connect the ground wire.
All there is left to do is to replace your new GFCI outlet back into the box, carefully folding the wires back inside as you go. Replace the holding screws, install a weatherproof cover and turn the power back on. You now have outdoor lighting, making your yard safe to walk through at night. You will also be able to invite family and friends over for an outdoor party and provide added security to your home. So, go ahead. Lighten up...it's easy. |